Introduction
Some time ago we had our first Polish PowerShell User Group meetup (Twitter | GitHub). On Tuesday afternoon, thanks to Objectivity as our host, we were able to gather nearly 40 participants. Three sesssions were presented:
-
DSC Intro by Pawel Jarosz (Twitter Blog) -
PowerShell Basics and Gotchas by Tomasz Dabrowski (Twitter Blog) - And Building your HomeLab done by me.
Presentations and code can be found on our GitHub.
The Story of a Lab
Many of us use some kind of lab during our IT Journey. Some are build as permanent environments, others are destroyed after a use case. There are also some brave ones that use production as a test environment.
This way or another - most labs I’ve seen are built on some virtualization platform - be it on-premises (home server hidden under the desk before your wife’s eyes) or cloud based (AWS, Azure, My-Friend’s-Basement).
As I like to tinker, I’m also forced to rebuild my workshop very often. What I learn helps me in my daily tasks.
I’d like to share with you the set up I have.
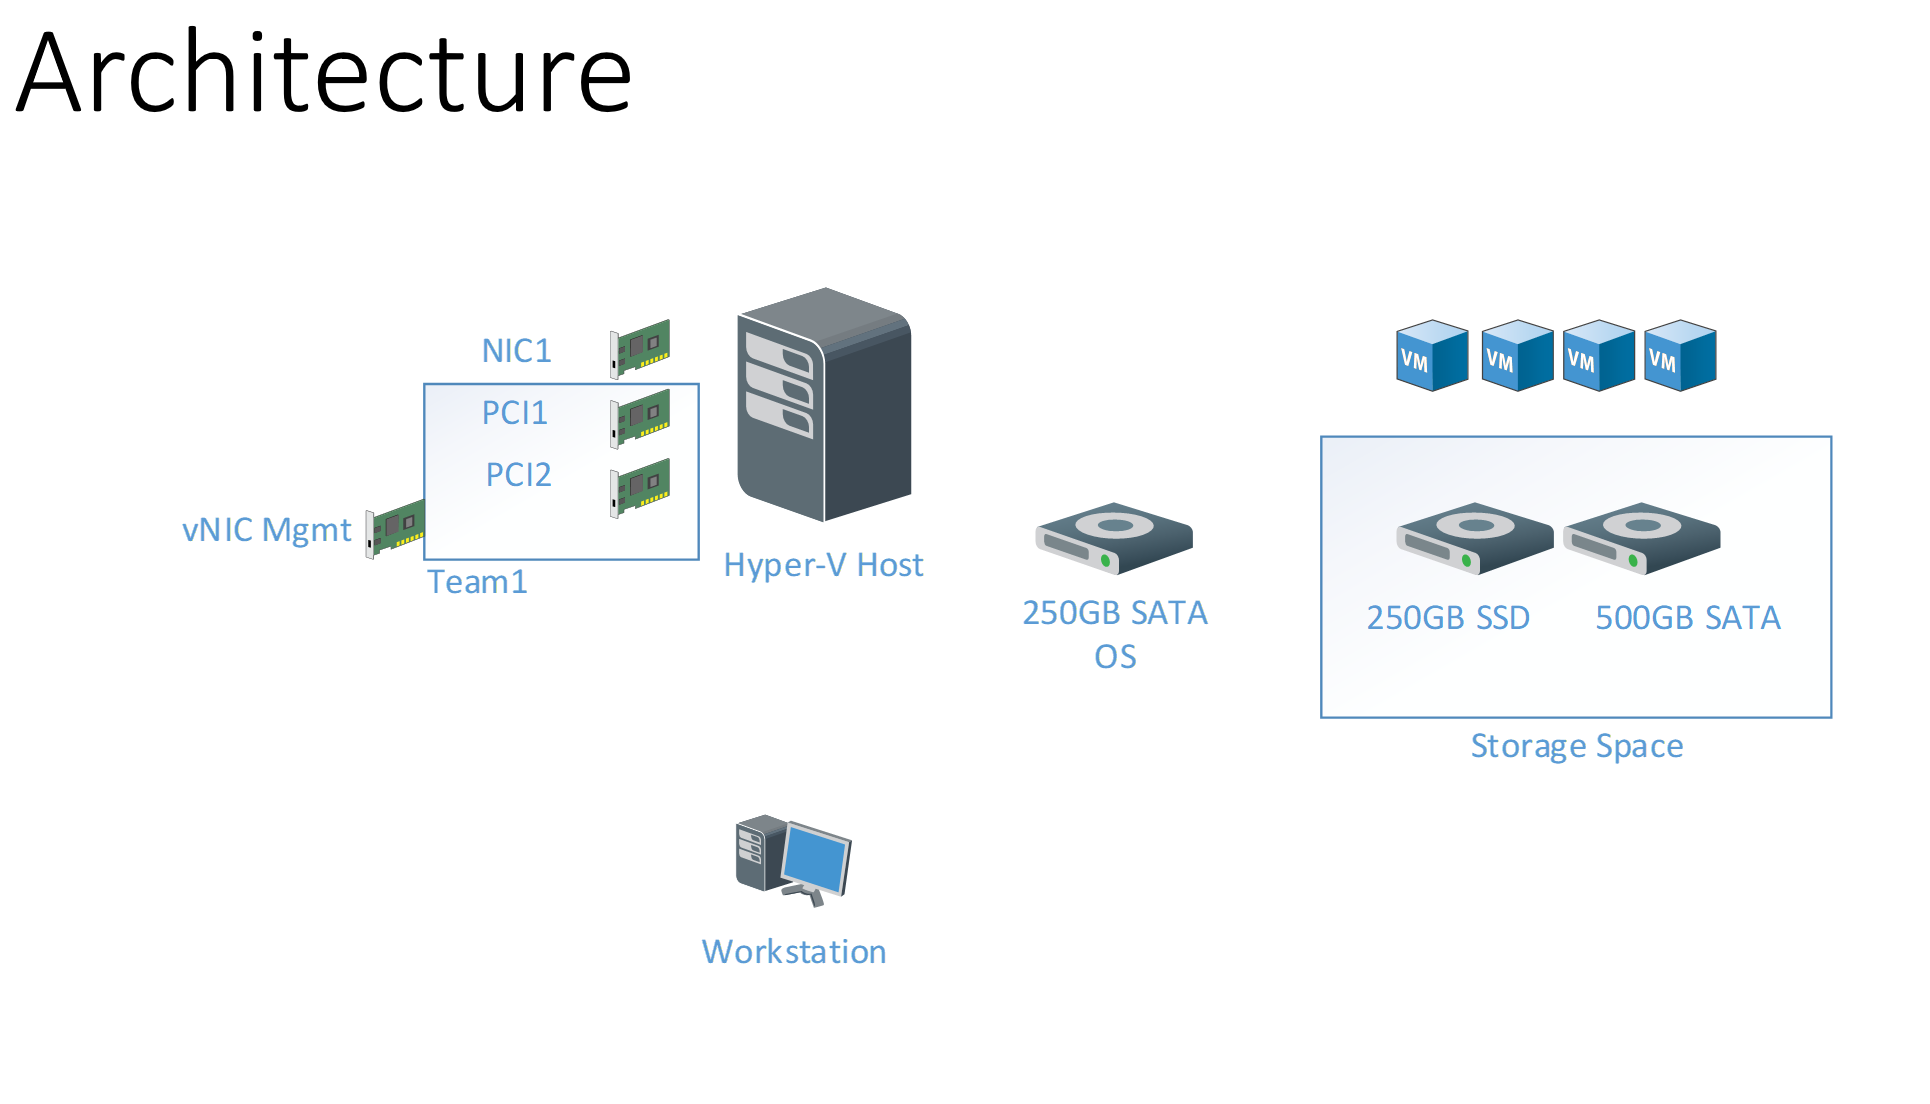
Hardware
It’s a rather beefy workstation (Lenovo C20) with dual Xenon 5620, 24GB RAM. On top of that I run Hyper-V with Storage Spaces for better storage utilization.
There are many ways that will allow you to run a Lab - some are paid (Azure Dev/Test Labs), some are free (Lability). Each has its pros and cons.
I wanted to make it easy and simple to setup a HomeLab based on Hyper-V 2016 on any modern equipment regardless of its components.
The concept
In production - our VMs are based on GoldImage - a reference VM with pre-set environment. So before a new VM is up-and-running we are:
- Copying up-to-date vhdx file to VMs destination location
- Building a new VM with required properties like CPU, Memory etc
- Attaching VHDX file to the VM
- Syspreping the VM
- Adding it to a specific domain
- Setting additional properties.
All that is automated and I’ll share that some time soon. For now, let’s take a closer look at first 4 steps.
HomeLab the easy way
Let me show you a rather simple way to set up a number of VMs running on Hyper-V host based on Windows 2016. The trick is, those VMs will be built based on a template VM and syspreped before deploying to production.
The only pre-requisite to this is to have Windows 2016 installed on a setup similar to mine:
The whole process is as simple as these steps:
- Have Host with Windows 2016 installed (still manual.ps1)
- Prepare Host for Hyper-V (1.After-Install.ps1)
- Prepare Hyper-V Host configuration file (2.Prepare-HVHostConfig.ps1)
- Deploy Hyper-V Host based on configuration file (3.Deploy-HVHost.ps1)
- Copy necessary files to Host (Copy to Host Folder CopyFiles)
- Prepare VM Templates – Gold Images (5.Run-PrepareVMTemplates.ps1)
- Prepare VMs configuration files (6. Run-PrepareVM.ps1)
- Deploy VMs from configuration files (7.Run-CreateVMs.ps1)
Install Windows 2016 Box
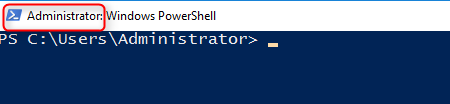
Once you have your hardware ready, and pure OS with all drivers installed it is time for host configuration. Run PowerShell as administrator. All commands will be run as Administrator. Remember to run it that way:
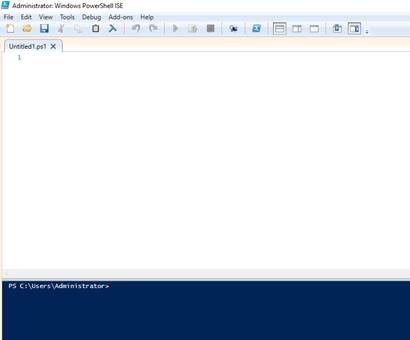
For longer parts of code I prefer PowerShell ISE – it’s easier to read or debug code:
Then run Enable-PSRemoting -force .You’re done. Log off from the box if you want to ![]()
1. Prepare Host for Hyper-V
Now, from your local machine prepare the host for Hyper-V configuration (Script file). This will
- install Hyper-V role
- allow for inbound RDP
- and enable ping response
2. Prepare Hyper-V Host configuration file
I have a bunch of servers like that running. They vary in hardware so I wanted to have it as general as possible. With this script (Script file) I’m preparing a host config file in JSON that will hold host specific properties like:
- Network properties (MAC address, interface name, IP Address, NIC Team membership, IP configuration)
- vSwitch properties (NIC team members, vSwitch name, managementOS NIC name and configuration)
- Roles configuration (Hyper-V, Storage - sizes and configuration of Storage Spaces
With this approach I can prepare a different JSON file for each of my hosts and deploy them with a single script regardless of their configuration. I can add or remove network interfaces from configuration, change Network Team configuration or space configuration - script should handle that.
3. Deploy Hyper-V Host based on configuration file
Once I have JSON I can start building my Host with this script (Script file).
I’m disabling VMQ first. I’m using 1GBit interfaces in my lab and to avoid issues (here and here and here) it’s best to disable that.
If by any chance you have 10Gbit interfaces in your lab - do not disable VMQ ![]()
Once I have that done the script is going to:
- Configure network interfaces based on given configuration (Interface names, IPs, etc) where the MAC address is the distinguishing property
- Configure network teaming
- Configure vSwitch
- Configure Storage Spaces
- Configure Hyper-V and create necessary folders
All that in one single sweep.
4. Copy necessary files to Host
By now I have my Hyper-V host up and running. Now I need to copy some files over to the host. In this file I’ve listed what files should go where. To prepare VMs I’ll be using trial images that you can grab here. Other files can be found on my GitHub.
5. Prepare VM Templates – Gold Images
Now let’s prepare 3 VMs that will act as our templates (script file). Those will be Windows 2016 with GUI, Windows 2016 Core and Windows 2012R2 with GUI.
Once VMs are running, they need to be altered a little bit to allow fo PS Remoting (same as Hyper-V host before). Just run this code on each VM:
#Fresh VM

Enable-PSRemoting -force
Set-ExecutionPolicy unrestricted -Force
Set-ItemProperty -Path 'HKLM:\SYSTEM\CurrentControlSet\Control\Terminal Server' -Name 'fDenyTSConnections' -Value 0
Enable-NetFirewallRule -DisplayGroup 'Remote Desktop'
New-NetFirewallRule -DisplayName "Allow inbound ICMPv4" -Direction Inbound -Protocol ICMPv4 -IcmpType 8 -Action Allow
New-NetFirewallRule -DisplayName "Allow inbound ICMPv6" -Direction Inbound -Protocol ICMPv6 -IcmpType 8 -Action Allow
If you need or want to add other this you can make it here. Disabling SMB1 is a good start:
Set-SmbServerConfiguration -EnableSMB1Protocol $false
sc.exe config lanmanworkstation depend= bowser/mrxsmb20/nsi
sc.exe config mrxsmb10 start= disabled
6. Prepare VMs configuration files
Now the fun part begins. When the environment is ready, I’ll use these last two steps to create VMs. With this script (script file) I’m able to prepare a consistent JSON file that will allow me to spin my VMs easily. Once I have those JSON created let’s see some more magic.
7. Deploy VMs from configuration files
With the help of this script (script file) I’ll create VM for each JSON file in specific folder:
- Read Hyper-V host configuration (VM location, vSwitch name)
- Read VHD templates (with my helper function Get-VHDTemplates utilizing another JSON. All copied over in step 4).
- Set sysprep properties - final local administrator name and password, unattend template file location etc
- With another helper function Set-VMSysprepedImage the vhdx is prepared:
- Template file copied to final destination and renamed based on VM name
- Unattend template file copied, sysprep properties added and then injected into vhdx
- Create new VM
- Adjust VM settings like memory, CPU, VLANs, Dynamic Memory
- Set IP configuration on the VM to static
- Sysprep the VM
- Remove the unattend.xml file from the VM (to avoid further, accident sysprep)
Summary
With all these I’m able to create my Lab environment in a consistent, repeatable way.
On top of that there is a number of happy VM config files. Those JSON filesare then stored in a code repository and use in the future depending on the test environment.
If you’d like to see some more real-life examples of VMs created from JSON files - stay tuned.
If you have any comments - feel free to contact me.